How To Master Diamond Drawing - A Simple Guide
Have you ever looked at a beautiful, sparkling gemstone and wished you could capture that amazing glow on paper? Well, you are in for a real treat, you know. Creating a picture of a diamond, especially one that looks truly real, is something many people find quite fascinating. This kind of artwork lets you play with light and shadow, making something flat appear to have a lot of depth and brilliance. It is a very rewarding skill to pick up, honestly, and it might be easier than you think to get started on your own gemstone art piece.
So, if you are someone who enjoys putting pencil to paper, or perhaps you are just starting out with art and want a fun new challenge, learning how to draw a diamond can be a perfect next step. This particular subject offers a chance to work on precise lines and angles, which are pretty important parts of making any picture look just right. You will get to practice making those straight edges and sharp corners that give a diamond its distinct shape. It is, in a way, a wonderful exercise for your hand and eye coordination, building up your drawing abilities bit by bit.
This guide is all about helping you achieve that lovely, glimmering effect in your very own diamond pictures. We will walk through the ideas and methods that help bring these precious stones to life on your page. By the time you finish going through these thoughts, you will have a much clearer idea of how to make your own sparkly diamond, looking as if it could just jump off the paper. It is a really satisfying feeling, as a matter of fact, to see your art come together like that.
Table of Contents
- Why is Diamond Drawing So Engaging?
- What Materials Help with Sparkly Diamond Drawing?
- How Can You Create a Realistic Diamond Drawing?
- Exploring Different Styles in Diamond Drawing
- Is This Diamond Drawing Tutorial for Everyone?
- Simple Steps for Your Diamond Drawing
- Getting Started with Your Diamond Drawing
- What Comes Next for Your Diamond Drawing?
Why is Diamond Drawing So Engaging?
Drawing a diamond always presents an interesting kind of task, you see, because there are so many specific angles and distinct forms to put down on paper. Unlike drawing something soft and flowing, a diamond demands a certain level of exactness. Each facet, which is like a small flat surface, needs to be placed with care to give the overall impression of a cut stone. It is a bit like putting together a puzzle where every piece has its own special spot. This challenge is actually what makes the whole experience so captivating for many artists, as a matter of fact.
The way light plays on a diamond is what gives it that famous shimmer, and capturing that in a drawing is a very rewarding part of the process. You are not just sketching a shape; you are trying to show how light bounces around inside the stone and then out again. This means thinking about where your light source is coming from and how it would interact with all those little surfaces. It is a skill that takes a little bit of practice, but the result, a picture that seems to glow, is truly worth the effort. People often feel a sense of accomplishment when they see their diamond drawing start to sparkle.
Moreover, the act of creating a diamond on paper allows you to explore the principles of light and shadow in a very hands-on way. You will learn about how different tones and values can make something appear to have dimension. It is a lesson in making things look three-dimensional on a flat surface, which is a core idea in drawing. So, too, it's almost like you are learning a bit of science while you are making art, which is pretty cool. This kind of project helps you grow as an artist by teaching you how to observe and then recreate complex visual effects.
What Materials Help with Sparkly Diamond Drawing?
To create a picture that truly looks like a real diamond, especially one that reflects and bends light in a lifelike way, you will find that certain art supplies are particularly helpful. Graphite pencils are your main tool for building up the darker areas and the varied shades that give the diamond its form. These pencils, with their different levels of hardness, allow you to make lines that are either very light and delicate or quite deep and dark. This range is pretty important for showing all the different ways light interacts with the stone, you know.
Then there is white charcoal, which is another great item to have on hand for your diamond drawing. While graphite handles the shadows and mid-tones, white charcoal is perfect for putting in those bright, intense highlights. These are the spots where the light hits the diamond directly and reflects back with a lot of energy. Using white charcoal can really make your picture pop, giving it that genuine glimmer that diamonds are known for. It is what adds that extra bit of magic, making your drawing seem to catch the light, as a matter of fact.
Having both graphite and white charcoal lets you create a full range of values, from the very darkest parts of the diamond to the brightest flashes of light. This contrast is what gives the picture its sense of realism and depth. Without these tools, it would be much harder to show the distinct way light travels through and around a diamond. So, you see, having the right materials is, in some respects, half the battle when you are aiming for a truly stunning piece of diamond drawing.
How Can You Create a Realistic Diamond Drawing?
Making a diamond picture look real means paying attention to how light behaves on its surfaces. You are trying to show the effect of light bouncing off and bending through the stone. This involves carefully building up layers of tone with your pencils. You start with the basic outline, of course, and then you gradually add darker shades to create the illusion of depth and form. It is a process of slowly shaping the light and shadow, almost like sculpting with your pencil, you know.
The key to getting that realistic feel in your diamond drawing is to observe how actual diamonds catch the light. They are not just one flat color; they have many different shades and bright spots. You will need to think about where the light source is and how it would illuminate each facet. This helps you decide where to put your darkest tones and where to leave areas very light, or add those bright white charcoal highlights. It is, in a way, all about creating a convincing illusion of light interacting with a solid object.
Adding those little touches of sparkle is what truly brings a diamond sketch to life on the paper. It is not just about drawing the shape; it is about making it appear alive with light. This can involve using a kneaded eraser to lift off some graphite for subtle highlights, or adding those sharp, bright points with your white charcoal. These small details make a big difference in how real and vibrant your diamond drawing appears. It is these tiny bits of light that really make it shine, as a matter of fact.
Exploring Different Styles in Diamond Drawing
When it comes to making pictures of diamonds, there are many ways to approach it. For instance, you might want to try making a cartoon version, which can be quite playful and expressive. Our artist, Amanda, has even created an example of a cartoon diamond, showing how you can simplify the shapes and still capture the essence of a gem. This kind of diamond drawing is often about conveying a feeling or an idea rather than strict realism. It allows for a lot of creative freedom, which is really nice, you know.
On the other hand, if you are interested in a more structured approach, you could explore and stylize a very popular cut of diamond: the round cut. This style is often seen in engagement rings and has a very distinct look. You can learn to draw it from different perspectives, which artists call foreshortening. This means drawing the diamond as if you are looking at it from various angles, making it appear closer or farther away, or turned in a particular direction. It is a great way to practice seeing objects in three dimensions and putting them onto a flat surface, basically.
Some tutorials might focus on showing you how to draw a very simple diamond in just a few easy steps. These often include straightforward line drawing and coloring suggestions, along with some quick tips to help you along. This kind of approach is fantastic for getting comfortable with the basic shape and understanding how to add a bit of color or shade. It is a good starting point before you try more complex diamond drawing projects, giving you a solid foundation, as a matter of fact.
Is This Diamond Drawing Tutorial for Everyone?
Do you want to learn how to draw a diamond in a way that is easy for people who are just starting out? Well, this kind of art lesson is often made to be super easy for both younger artists and grown-ups. It is designed so that anyone can follow along, step by step, without feeling overwhelmed. The idea is to break down the drawing process into small, manageable parts, making it accessible to a wide range of people. You do not need any special prior experience, which is pretty great, you know.
The aim is for you to be able to make your own diamond pictures in no time at all. This kind of learning experience often includes very clear instructions that guide you through each line and shade. It is about building your confidence as you go, so you feel capable of creating something beautiful. Whether you are a kid who loves to sketch or an adult looking for a relaxing new hobby, these easy-to-follow steps are there to help you succeed. It is, in a way, a very friendly introduction to drawing something that looks quite intricate.
Some lessons even offer a directed drawing printable that comes with all the lines and shapes you need to trace or follow along with. This can be a huge help for beginners, giving them a solid guide to work from. It takes away some of the guesswork and lets you focus on the techniques of shading and adding sparkle. So, too, it's almost like having a personal art teacher right there with you, making sure you get every line just right for your diamond drawing. This kind of support really helps people feel comfortable trying something new, as a matter of fact.
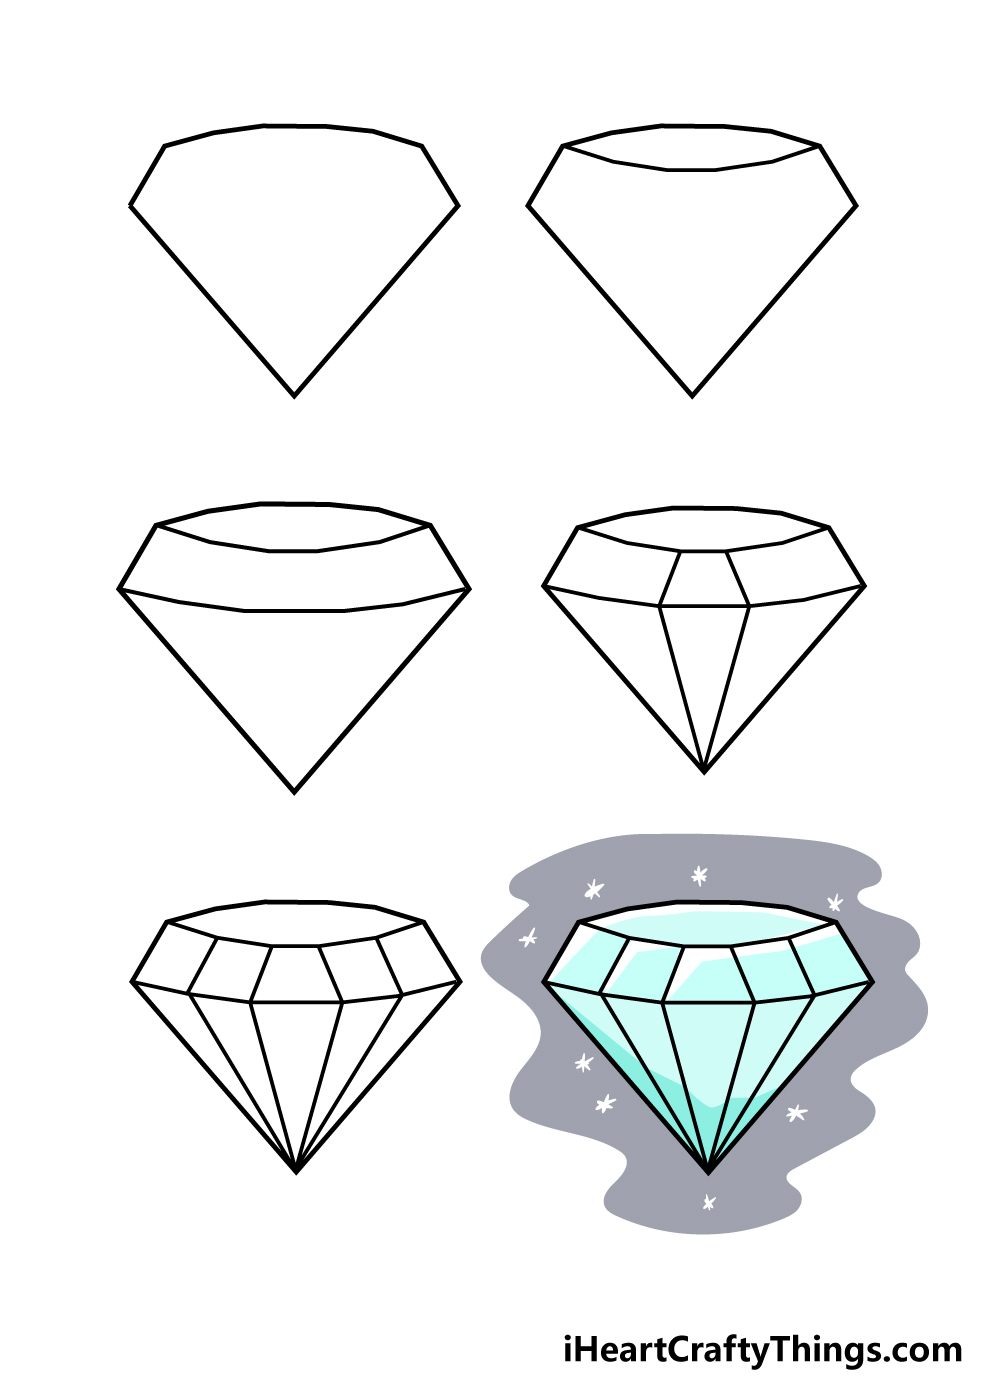
Simple Steps for Your Diamond Drawing
When you are ready to make your very own sparkly diamond, you will find that a step-by-step approach makes things incredibly simple. These kinds of lessons often show you how to draw a basic diamond in about six clear steps. Each step builds on the last, guiding your hand and eye through the process. It is about breaking down what might seem like a complicated object into easy-to-manage parts. This way, you are never left wondering what to do next, which is really helpful, you know.
These simple guides usually include clear examples of how to draw the lines and how to add color. You get to see what each stage should look like, making it much easier to follow along. There are also often quick tips sprinkled throughout, offering little bits of advice to help you improve your drawing. These tips might cover things like how to hold your pencil for different effects or how to make your lines cleaner. It is all about giving you the practical know-how you need for your diamond drawing.
You will get to work on making straight lines and angled lines, which are both very important for the shape of a diamond. These are fundamental skills in drawing, and practicing them with a diamond shape is a good way to improve. Then, you will learn how to add that special bit of sparkle, which is what truly brings your diamond sketch to life on the page. It is a very satisfying feeling to see your drawing go from simple lines to something that looks like it could twinkle, as a matter of fact.
Getting Started with Your Diamond Drawing
Before you begin putting pencil to paper for your diamond drawing, it is a good idea to gather the things you will need. While specific lists might vary a little, generally, you will want some graphite pencils of different shades, and certainly some white charcoal for those bright spots. Having a good eraser is also pretty important, especially a kneaded one, which can lift off graphite without smudging too much. Good quality paper is also a nice thing to have, as it handles layers of pencil much better.
Setting up a comfortable spot to draw is also quite helpful. Make sure you have good lighting, so you can clearly see your lines and the shades you are creating. A flat surface to work on is also key. Once you have your materials ready and your space set up, you can really focus on the drawing itself. It is about making the process as smooth and enjoyable as possible, which really makes a difference to your diamond drawing experience, you know.
Remember that the goal is to enjoy the process and to learn something new. Do not worry too much about making it perfect on your first try. Every line you draw is a step in your learning. The more you practice, the better you will get at capturing that special look of a diamond. It is, in a way, a journey of discovery, and each drawing helps you understand a little more about light, form, and how to put it all on paper, as a matter of fact.
What Comes Next for Your Diamond Drawing?
At the end of going through these ideas, you will have a clearer path to creating your own diamond drawing. The aim is for you to possess the know-how to make a picture that truly captures the glimmer and form of a diamond. You will have learned about using different pencils to show light and shadow, and how to add those bright, shining points that make a diamond look real. It is about giving you the confidence to tackle this kind of art project, you know.
You will find that with practice, drawing straight lines and angled lines will become much easier. These are skills that are useful far beyond just drawing diamonds; they are fundamental to many kinds of art. And adding that little bit of sparkle to your diamond sketch, making it come alive on the page, is a skill that you can apply to other shiny objects too. It is a very versatile set of abilities that you will be picking up, which is pretty cool.
So, if you are looking to make your very own sparkly diamond on paper, this kind of step-by-step guidance truly simplifies the whole thing. You will be making them on your own in very little time. The ideas presented here are meant to make the process easy and fun, allowing you to focus on the joy of creating. It is a rewarding feeling to see your art come together, and these steps are designed to help you get there, as a matter of fact.
Diamond Drawing - How To Draw A Diamond Step By Step

How to Draw a Diamond Easy Step by Step Drawing Tutorial for Kids

How to Draw a Diamond - Really Easy Drawing Tutorial
